Monday, December 14, 2015

My New Year blog-olutions

I've been thinking ... dangerous I know. 

I've noticed a trend with some of my favourite bloggers. Writing less and less and just snapping more and more. What? It's the Instagram sharing I'm talking about. 

My current Instagram feed - with Jingle our elf and a few handmade Christmas things

I made some amazing dolls clothes yesterday as my little girl is getting an Australian Girl Doll for Christmas from her grandparents.

Of course I want to share with  you. Do I:

  • take photos - either with my DSLR camera or iPhone
  • transfer to computer
  • editing them, adjusting the colour, cropping the size, adding my business name
  • write up a blog post, adding links to all the patterns I made
  • press go and perhaps be seen by the 5 people who follow me

Or ...

Share a quick snap on Instagram, quickly using one of the various filters to make the photo look better, hashtag and tag to share around and receive heaps of comments and those awesome little love buttons!!

You see where I'm going with this. 

So my New Year's blog-olution is to just not stress about my blog so much. I absolutely intend on sharing more. Possibly when I make something amazing, that I want people to find, that I want to share forever more. But when it comes to my day-to-day crafty capers - you'll see more of me in my favourite place ... Instagram!

Do you have a New Year resolution? Or Blog-olution?


Thursday, November 12, 2015

Open for business


Been a little quiet around here but busily preparing for markets and our online store is now open again. 

You will find these items available now with more coming soon. Some are new, some are end of lines - with discounts!

Shop now for Christmas or a new summer wardrobe. 


Friday, October 9, 2015

Hour basket for a baby gift

Not ANOTHER hour basket right?

And there are more, I just haven't blogged them!!


Another baby to make for and this time I was factoring in that I would be going to Brisbane for work so wanted something easy to transport. 

I was fortunate to win this car fabric on Instagram and teamed with a Kona red solid and this awesome grey inside - it made a fantastic storage basket for nappies and so forth now and can't you just imagine it filled with cars in the future? 

The pattern says you can make the basket from a fat quarter but I'm not convinced. By adding this strip at the top, I was able to make it work. Possibly due to this directional fabric? Or my own bad measurements!


Hope little Darcy likes his gift ... eventually!

Wednesday, October 7, 2015

New baby gift set


My next door neighbour had her second baby last week. We are pretty close and when I got the call, was happy to head over for a sleep over to take care of bubs big sister (she is 2!). It was a pretty exciting week with lots of playdates with my two older owlets, remembering how all consuming toddlers can be and a few sneaky little newborn cuddles - and by that I mean when he was just one day old!!! (Cue the 'nawwhhhhhs'). 

I knew I wanted to make something as she would appreciate a handmade gift. After a little online searching and checking through my stash (determined to use what I had), this is what I came up with. 

Snuggle blanket

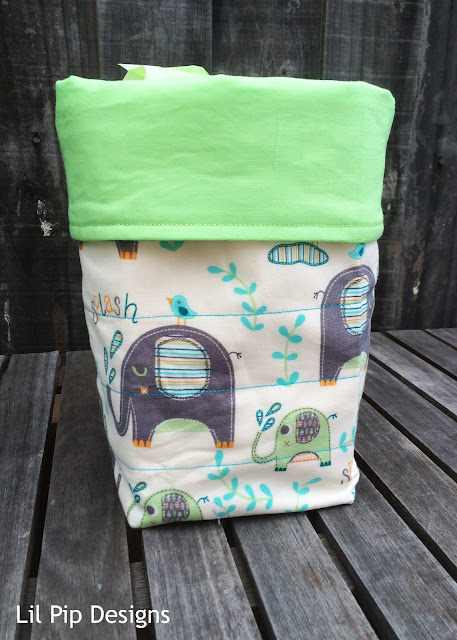
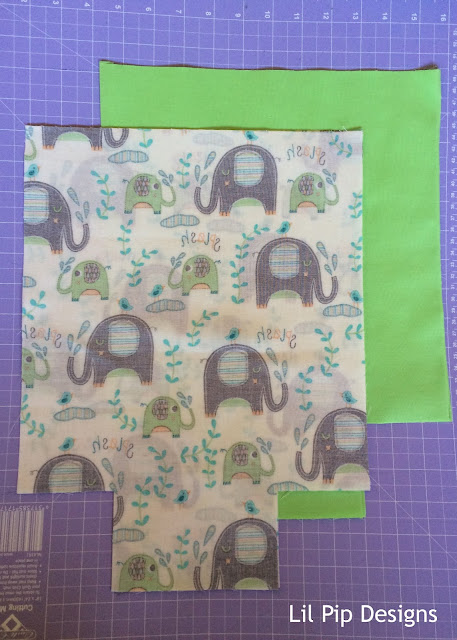
Backed with beautiful soft minky, this little blanket is designed to wrap baby now but perhaps just snuggle with as he grows. It isn't huge and I just used what I had in terms of fabric. (I forgot to take measurements but probably around 30inches square - or 75cms). This gorgeous elephant splash fabric from Spotlight has been in my stash for a year or so. Happy to put it to good use!


Fabric basket

There was only a very narrow strip of fabric left after making the blanket and I wanted to use it all. I decided to make a little fabric basket and this time teamed it with a Kona Solid called 'Pear'. 

If anyone knows where my extensive selection of interfacing has disappeared to - I would love to know. I found a little batting and quilted it to the outside. Raided one of my Sew Box's for some thin interfacing for the lining (really need to find the medium and thicker weight interfacing I know I have!).


If you are interested in the template before I made it - the dimensions are around 13 inches high x 11 inches wide. I cut 3 inch squares from each corner (probably could have been 2.5). 


It is perfect now to fit a nappy or two, wipes and nappy bags but a good size to stash some toys as he grows. 


Elephant taggy toy

I cut out these elephant shapes months and months ago from a Flosstyle Babies First Toy pattern - see my review here. But in a HUGE fail moment, I cut four the exact same way (rather than flipping so I would have matching sides). 

In a lightening bolt moment, I thought I would make these little taggy toys. There seems to be lots of babies around me at the moment so I whipped up four at the same time. 

Miss 6 got involved and choose all the ribbons and backing minky. 

This little orange guy went with our gift next door.


How awesome is this orange?!?


And the four together - with teal, pale blue and green backs. 


I didn't bother wrapping the gift - popped it all in the basket, ribbon around and delivered next door. 


It was wonderful putting this gift set together. Do you have a go-to newborn gift to make? I have another to share with you soon!


Monday, October 5, 2015

Cotton and Steel Herringbone Quilt ... and why I will never make 120 HSTs again!


Ms Midge (aka Melissa but seriously everyone calls her Midge!) regularly hosts Charm Swaps and when I saw this one come up for Cotton and Steel - I was in!

56 people buy two fabrics, cut them into 5 inch squares, send them to Midge who sends back the 112 different squares. I had no idea what I was going to make but knew I wanted something for myself. 


I searched Pinterest for ages. I'm really not a quilter (though according to Midge - now I am!) but I really wanted to do something with these that wasn't just sewing the squares together. 

So I decided on this cool herringbone pattern and teamed it with this Charcoal Shot Cotton from Spotlight (which was used by a couple of others in the Swap group). 

I started with a couple and laid them out ....


Did a mountain of trimming (I was trimming the four sides as I don't trust myself on the two side method) ...


Ended up with about 120 squares (or HSTs - half square triangles). I didn't use them all. Oh and no pinks or reds are in my quilt - I'll make something else with those.


Decided to do a variegated pattern rather than random. Love the end result with this going from the dark blacks and navy's on the left, the blues and greens in the middle, the neutrals and multi coloured on the right. 


I know this really chopped up some of the patterns and some might say I ruined some of the charms (I couldn't bare to chop into a couple so saved them for other projects) but I think there were a few successes to. 

Little birds ...


Friendly spider!


I'm tracking down some more of this charcoal shot cotton so I can add to the top of the quilt and make it a proper queen size. Then I'm going to send it off to be professionally longarm quilted. No way am I attempting this one myself. 

So I will make HSTs again, I think I'm rather good at them now but seriously it will be a long time before I make this many for one quilt. Really not my favourite thing.

I'm pretty happy with the end result!!


Ms Midge

Monday, August 31, 2015

Easy Weathervane Block Tutorial by Bee in My Bonnet

Another week, another block. 


This time the Easy Weathervane Block by Bee in My Bonnet. While I agree in theory this is easy, I really struggle with the small blocks, much prefer the larger finished size of 10-12" square. This one finishes at just 6.5" x 6.5" unfinished. 

If you wanted to try the same block in a bigger size, another Quilt Block Boot Camp member suggested this one by McCalls which is 12" x 12" square.

I struggled a little with the requirements in the tutorial. If you are more methodical than visual, here is what you need (excuse the likely late night quick photo in bad lighting!): 

  • 1x 2.5" square centre (strawberry) 
  • 4x 2.5" square middle sides (gingham) 
  • 12x 1.5" square for the corners (strawberry) 
  • 20x 1.5" square white 


Really not sure that I will be rushing to make this one again but honestly it was good to know that I will happily avoid small and scrappy blocks!!


See previous posts here:
  1. Joining in - with Raspberry Kiss and Hearts
  2. Economy block
  3. Cross Stitch block
  4. Pinwheels 
  5. Flying Geese
  6. Tic Tac Toe 

Friday, August 28, 2015

Solstice Star Series, Ribbon Star by Fresh Lemon Quilts


Another week, another block - this one is from the Solstice Star Series by Fresh Lemon Quilts. This one is called the Ribbon Star. It was a fun one to make. 

Really need to make some things with all these little (and big blocks). I need a some days in the sewing room to just pump out some cushions, bags, hangings, runnners or what ever I end up making with them!

See previous posts here:
  1. Joining in - with Raspberry Kiss and Hearts
  2. Economy block
  3. Cross Stitch block
  4. Pinwheels 
  5. Flying Geese
  6. Tic Tac Toe 

Wednesday, August 26, 2015

Ninja quilt for a new baby boy


A friend asked me to make this quilt as a gift for a soon to be born, baby boy. They are obviously into martial arts and would love a quilt made from ninjas with strong colours of black, red, cream and grey. 

The range is Year of the Ninja by Scott Jarrard for Riley Blake

I debated over what I was going to do for ages but then decided to keep it really simple - just 5 inch squares and basic straight line quilting. 


The binding is one from Sew This and That (a Brisbane based store I recently discovered that is fantastic!). It is called Marcus Fabric's Quartette Collection and is a lovely cream and black and I love how well it worked together. 


Hope the little guy loves these dragons on the back - surely they would cause nightmares!! I quilted it with Aurifil 2600 silver and just love how it looks on the back. I can't believe it doesn't have any tucks but I will take a look at some basting spray for a smoother finish.


Before I finalised the design, I played with the idea of a disappearing nine patch. Rather than waste my efforts, I turned it into a little cushion and used the awesome zip insertion tutorial by MsMidge for the back. 


Welcome to the world little one and I hope you grow up to be a ninja just like mum and dad!

Monday, August 24, 2015

Open Wide Zipper Pouch - glam style!


When my swap partner - Leanne from Sewn by Leanne - told me her fabric colour was orange, I might have panicked. I really don't have ANYTHING in my stash that is orange. Other than this single solid piece of cotton (which is quite thin, possibly a poplin?). I wanted to make something with her favourite colour so decided to use it for lining a zipper pouch.

I used the Open Wide Zipper Pouch by Noodlehead tutorial - I use this technique so much now! And decided to go glam with this navy and gold fabric I picked up from Spotlight. 

This one is much bigger than the other little hexie pouch I made. Perfect for storing sewing supplies or even could be used as a clutch for a day out. 

Thursday, August 20, 2015

Hexie zipper pouch


I'm very guilty of sewing just a few extra things when I do swaps. Just can't help myself. 

I've been looking at making a hexie (english paper piecing) cushion for my daughter. I have well over 100 probably close to 150 little 1 inch hexies made now. I remember Ros from Sew Delicious had made a little mug rug with hexies but thought I would try a little pouch. I really like the more modern spaced look rather than joined together. It was a good way to try the method before making something bigger.

Check out my inspiration board on Pinterest for all sorts of ideas with hexies.

The pouch is only small (whoops didn't take measurements before I sent it but the zip is probably only 6 inches so about that size). 

I adore this sewing themed fabric from Cotton Factory. Not sure if it is on the website as I bought from Instagram. Probably should get some more as I know I will love using it for swaps and myself!

Lined with a very bright Kona solid - Pear from my Aussie Kona Club by Handmade by Emily.

Popped a few little goodies from Daiso in the parcel too. 

Hope my swap partner likes it! If she is anything like me, another little pouch is always handy.


Tuesday, August 18, 2015

When Quiet Play meets Hour Basket and matchstick quilting ...


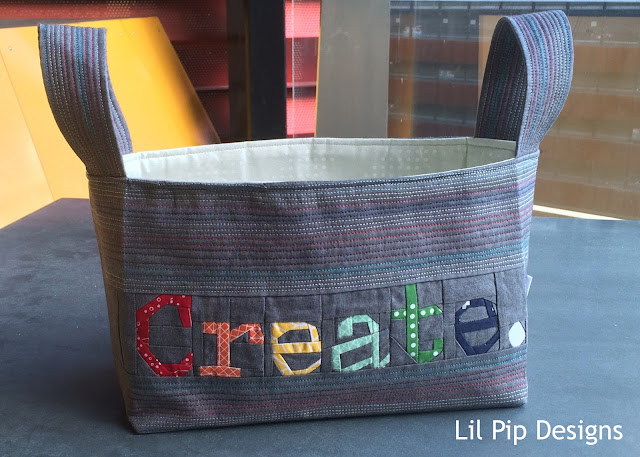
You may have seen this shared on my Instagram. I hope that everyone will indulge me when I gush over this one! Have you created something that you are just so incredibly proud of? That you look at and think 'I actually made that!!'. Well this in my project.

I made this for a swap - my partner was Leanne from Sewn by Leanne (go and take a look at what she made me and some crazy silly photos I sent her which are now out there - eeeekkk lol!!!)

Leanne shares my love of Cotton and Steel. Her sewing space is in her kitchen (mine is my bedside table!) so I was mindful not to make something that was too out there and could happily sit in a kitchen or sewing space.


I saw this amazing paper-piecing by Kristy at Quiet Play and knew Leanne would appreciate it (ya kinda want the person who receives it to know about the hours that goes into it!! Not quite as easy as it looks!). 


This is the panel when I finished. I decided it was a bit flat. It needed something but I wasn't quite sure what. 

I haven't mastered free motion quilting yet but when I googled straight stitching, I stumbled across the idea of 'matchstick' quilting. Basically straight(ish) lines really close to each other. 

It gave me the opportunity to play with my new Aurifil cottons (thanks to MsMidge) and I went to town with all the different colours. I can't even begin to tell you what amazing texture this gives the basket. You just can't help but touch it. It does have an added bonus with the handles standing up nice and firmly there.


All it needed was a little more C&S for the lining. 


Honestly, I can't even begin to describe how hard it was to send this one. Lucky it was going to a very deserving person (seriously I'm joking here people!).

Stay tuned in the next few days as I share the other couple of things I made to add to the parcel. 


Related Posts Plugin for WordPress, Blogger...