Thursday, June 20, 2013

Tutorial: How to add pockets to a simple skirt


Welcome to my first tutorial. I'm a little worried about putting it out there. Not sure if you will find it valuable. But I figured that I worked it all out myself so why not share the knowledge. No doubt it isn't original, I don't think much is in craft and sewing. I'm sure in years to come, I will laugh at the photos (on my bed!). I was competing with fading light on a rainy, Sunday afternoon and it was less than ideal. And I have so many! Well I guess more photos is better than not enough. Oh and I promise I own an iron - lol! Anyway, this is how you can add one type of pocket to a simple skirt pattern. 


My favourite basic skirt pattern is the Simple Skirt Pattern by Leila and Ben. I bought it ages ago and love that I don't have to think about all the measurements. Oh and it has another cute little pocket pattern to add to the front. 

How to add pockets to a simple skirt

Step 1: Cut out your rectangle pieces as per your pattern. I made a size 5 for my daughter (I will admit it is a little big for Miss 4). 


Step 2: Create your own pocket templates. I used an old calender so it was on thicker card. You can see my measurements below which work for a size 2-5 pocket. I find with a size 1 pocket that is it too long but you can adjust this. I used a bowl to trace the curve edge.

The smaller piece is the part that you cut from the front of the skirt. You don't want to make this too big. 

You need to cut four of your cotton or feature fabric from the larger piece.


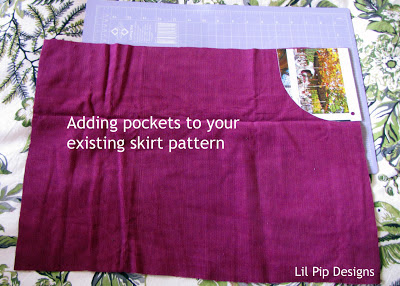
Step 3: Cut two sections from the front of your skirt with the small pocket piece. And yes I should have ironed this!
 

Step 4: Cut out four pieces of your cotton or feature fabric. Remember that you are only going to see a tiny bit of it peaking out so you only need to worry about what it showing there (I tried to have two little owls). You also need to be careful of your left and right sides.   


Step 5: Cut out the small pocket piece of just two of the four pieces. This will be the pieces that will face your skirt. See the next photo.


Step 6: Place the wrong side of the pocket to wrong side of your skirt and sew a basting stitch close the the edge (I suggest a 1/8 inch). Noticed I ironed these!!

  
Step 7: Sew in your favourite bias tape (isn't this gingham darling!) or make your own. I prefer to sew it onto the wrong side of the fabric first and sew it down from the front so I make sure the stitches are covered and it looks all neat from the front. 

  
Step 8: Now sew around the curve of your two larger pocket pieces and finish either with a zig zag or serger/overlocker.


Step 9: Now you can see the front and the only part of the pocket that you will see. Sew a basting stitch along the top and side of the pocket to hold it in place.


Final steps: Finish your skirt as you usually would. Sew both pockets in. Hem the sides. Make an elastic casing. Hem the bottom or add a feature fabric as I have with this one.


As I said, I think this particular skirt is a little big for Miss 4. I also think I'll make the bottom panel shorter. I was trying to showcase the pattern with the little trees, deer and owls.
 
Watching a lady coming along with her dogs
I think this skirt would look lovely with a flat front to really show off the pockets more too. 


Perfect pockets!
I hope you found this tutorial useful. I hope to bring more to you, including some of my own patterns. I would love to know if you make a skirt using this pattern. I'll have to work out how to set up a flickr group!

I just want to use this pink gingham
bias tape on everything!

Another example with navy cord and white bias
Featured with thanks:

Linking with:


11 comments:

  1. Great first tutorial! Hopefully the first of many to come :) I'm off to pin this now ;-)

    ReplyDelete
  2. Fantastic, pinning this and the skirt is adorable!

    ReplyDelete
  3. The skirt is simply adorable. I love your choice of colours.

    ReplyDelete
  4. Wonderful tutorial! I loved the outcome!
    Great post!! I included it in my post Βόλτα στη Γειτονιά!!! ...while sewing!! :)
    Have a great weekend!!

    ReplyDelete
  5. I was very pleased to find this site.I wanted to thank you for this great read!! I definitely enjoying every little bit of it and I have you bookmarked to check out new stuff you post. cheap hyip template

    ReplyDelete
  6. I really appreciate this wonderful post that you have provided for us. I assure this would be beneficial for most of the people. cheap hyip template

    ReplyDelete
  7. I was very pleased to find this site.I wanted to thank you for this great read!! I definitely enjoying every little bit of it and I have you bookmarked to check out new stuff you post
    hyip templates

    ReplyDelete
  8. Will you be at a grill on a sweltering summer day? Will you be going on an evening date to an external show? Most ladies' apparel stores convey easygoing skirts, and you ought to have no issue finding the skirt that accommodates your way of life or event you are looking for a skirt for. check this out

    ReplyDelete
  9. Cowhide Smaller than usual skirts: Calfskin scaled down skirts are generally famous with young ladies. Leslie Jean Designs

    ReplyDelete
  10. whatsapp plus 2021 It is the most popular application after Facebook in social media platforms. Most people use this WhatsApp application for messaging to each other a

    ReplyDelete
  11. Twofold Needle Stitched: Used mostly on sleeve/bottom fixes and alludes to an equal line of stitching. This type of stitching gives durability and a cleaner, more completed look. black leather jacket mens

    ReplyDelete

Related Posts Plugin for WordPress, Blogger...